
Just a quick post to let y’all know that I posted a few more pics.

Just a quick post to let y’all know that I posted a few more pics.
A quick update while I’m waiting for my laundry to finish…
Progress on Hut 2.0 has been slow. I’ll be honest. Working alone means every task requires at least double the effort, which in turn requires double the motivation. Which means everything takes at least four times as long, or, if it’s 96F in the shade like it was yesterday, about 16x as long. So… since my hut raisers left, I’ve gotten woefully little done. I’ve added diagonals to all the 4×4 posts, put up a couple of posts that’ll hold the roof beam off of which the rafters will hang, cut the roof beam, measured out the places where the rafters will go… and that’s about it. Oh, and I read a book.
In other news, the garden is starting to mature, and I’m slowly starting to harvest some vegetables. So far, I’ve gotten some decent sized green beans, and it looks like I’ll have a yellow crooked neck squash ready for harvest in another couple of days, with plenty more on the way. I have an egg plant on the way too, though I’m not sure how big it’ll be. The tomatoes are still green, and taking their time ripening, but they’ll get there soon, presumably. I also just noticed today that I have some cucumbers on the way, which is exciting. The corn is also maturing, though the stalks aren’t nearly as tall as they should be, so we’ll see how big the cobs will be. Over all, it seems like most of my vegetables will be small in size and yield, but I’m happy to be getting anything, seeing how this is my first year growing a garden. I’ve learned a lot, and perhaps I’ll do better next year.
Next week, I’m off to Burning Man, which basically means packing up my camp and bringing it to the desert in Nevada. I wasn’t planning on going, but decided a few days ago that it’d be fun to hang out around crazy people for a change. I’m planning to organize an ad hoc gathering at my camp for people who want to (or think they want to) go live in the woods and/or build huts and cabins, to talk about my experiences and share information. We’ll see if anyone shows up. If there are any Burners out there reading this blog, keep an eye out for a flier on that board near center camp where such things get posted.

Turn out for Hut Raisin’ 2.0 was an entire 33% higher than Hut Raisin’ 1.0, for a grand total of 4 people. Josh and Keith, last year’s helpers, returned, and this year we gained another Josh. We got a total of about a day and a half of building in, and I’m quite pleased with what we accomplished in a relatively short time.
Improvements over Hut 1.0 are numerous. We got off to a great start on Saturday, by laying down a “foundation” that is both square and level. The foundation was the part that I was most unsure about, but things worked out beautifully. We laid down two rows of cement blocks, and once we got them spaced and lined up, we got each individual block leveled. The terrain is inherently sloped and uneven, so instead of trying to level all the blocks in relation to each other, the 4×4 blocks that were placed between the 4×6 beam and the cement blocks were custom cut to compensate for the various height differences. At the end, we had two parallel beams, and then two 2x6x8 boards were attached to the end of the beams. To make sure everything stayed square, we calculated what the distance between the opposing corners of the beam should be, using Pythagoras’ good ol’ theorem, and checked it often, making minor adjustments as necessary. After that, we put in floor joists, then after squaring everything up one last time (and breaking for lunch), laid down OSB sheets that’ll act as the floor for now.
Then we started building up. The 4×4 columns were next. While the corner posts were held up vertical by temporary diagonal supports, we started working on the loft walls, working late into the night. Just about everything went according to my original design, and the only improvisations I had to make were diagonal supports, of which I used many. The next morning, we continued putting up the remaining loft walls, and finished off by putting up the loft floor itself, before everybody had to leave.

There’s still a ton of work to do, obviously, but I’m very happy with what we built. Most of all, I’m particularly pleased with the foundation. With Hut 1.0, I didn’t bother to level or square the “foundation”, and that naturally caused all sorts of problems later on, least of which was the tendency to roll in one direction when sleeping in the loft. This time around, the foundation feels solid, it’s square, and level. We also made sure the 4x4s were vertical when we put them up, and I’ve been using plenty of diagonal supports to make sure it stays that way. Though, all the diagonals are currently up top, so at the moment, the joint between the 4×4 columns and the floor are completely unsupported, thus allowing for some wobbling. I’m sure it’ll firm up once the siding goes on, but I’ll probably add some diagonals at the floor level too.
I’ll be working on the hut alone for the next few weeks. With the loft in place, I should be able to start working on the roof on my own. I should also be able to put in the windows, put up the first layer of siding and insulation, and then I might try and get more help to put up the exterior siding. I still haven’t bought roofing, so I’ll need to figure that out too. Hopefully I’ll be able to finish everything by the end of September, well before the rain and cold. So if you missed Hut Raisin’ 2.0, you might still make it to Hut Finishin’ 2.0 in September. Stay tuned for details (and for updates on the hut, of course)…
Also, check out the other photos from Hut Raisin’ 2.0 on Flickr!


I spent this past weekend down in Chico hanging out with my friends Keith and Stephanie (and their 3 cats), and designing my new hut. On my way down, I spent a few hours at Lowe’s (which had the best prices and selection in the area) gathering item numbers and prices on building materials I might use, then started a spreadsheet to keep a tally on how much of everything I’d need, and how much it’d cost. While designing the hut, I tried various permutations on building materials, and hut sizes, to try to minimize cost while maximizing HAI (Hut Awesomeness Index).
The hardest part was deciding on the dimensions, partially because it’s difficult to imagine how a certain amount of space would feel like. The best I could do was to picture myself in my current 6’x8′ hut, and try to imagine what it would look like if that wall were pushed back 4 feet, and that other wall was set back 2 feet, and the ceiling was 8ft high, or maybe 7ft high, with 2×4 trusses instead of 2×6, and if the window was there, there and there, with a ladder to the loft here, or maybe there… Yeah, it’s impossible. Our perception of space is affected by so many factors, including lighting, head room, colors, and little details like how many 2x4s are jutting out, that, at least with my lack of experience, it’s very difficult to try and anticipate the feel of the space.
At the end, I settled on a an 8ft by 12ft hut, with a 4ft by 8ft porch out front. There will be an 8ft by 8ft loft, set 8ft off the floor. I considered lowering the loft to reduce the overall dimensions (for lower cost and wind profile), but having extra headroom will make the place feel more spacious. The loft has “walls” about 16 inches high, and the apex of the 45-degree-pitch roof will be a little under 4ft above that, which means I should almost be able to stand up in the loft if I’m in the middle (one of the benefits of being relatively short, at 5’7″). The loft will have 1’x4′ sliding windows on 3 sides, for light and ventilation. For the lower level, I wanted to try using 4x4s spaced roughly 4ft apart, instead of the more typical 2×4 construction, since the studs would be exposed inside and having fewer bigger columns would look less cluttered than having 2x4s spaced 2ft apart. In general, I used lumber sparingly, hoping that my intuition would be right, though I’ll improvise as I go and add reinforcements where I feel would be needed.
Once my preliminary design was done, my spreadsheet said I’d need $1212 worth of supplies to start building. That didn’t include a few “optional” materials like a couple of windows I wanted (but didn’t need), or roofing panels (which they didn’t have in stock), and some small things like nails and brackets (which I could also get at the local hardware store). I printed out the final list, and headed to Lowe’s.
Fortunately, the sales manager was at the counter, instead of his minions. I asked him about discounts, and he told me that I could get a 10% discount if I got a Lowe’s credit card, or 20% if I was a business. I thought about it, and decided that I could call myself an independent contractor, and apply for the business account. Though, as I was filling out the application form, the manager offered to give me 20% off even if my application wasn’t accepted. Score! But, wait! That means I can reverse all those cost-cutting trade-offs I’d made! I can get more stuff! I hurriedly scratched out the app (I didn’t actually want the credit, if I was going to get the discount anyway), then started revising my order. I’d get treated lumber for the “foundation”. Hey, I’d get one of those windows on clearance for $90, which would now be $72. Actually, make that two windows. Oh, and let’s throw in more lumber. And a few 5lb boxes of nails. It turned into a veritable shopping frenzy. I was practically frothing at the mouth, as I rattled off item numbers. At the end, including tax and delivery (which alone was $139), the order came out to around $1350. Not bad.
I should get the delivery on Wednesday, though that’s no simple matter either. Since I don’t have a street address, they only put in my nearest town, and the driver will have to call me for precise directions to the dirt road (hopefully the driver will have a GPS, and I can give him the coords). The delivery truck almost certainly won’t be able to come up the last stretch of the dirt road to my camp, so I’ll probably get the driver to dump everything a few hundred yards away, and we’ll haul it the rest of the way by hand (or perhaps on the roof of my car).
Getting the materials ordered (and getting a nice discount), and knowing that they can deliver to my property has taken a load off my shoulders though. As long as the delivery goes smoothly, I can spend most of this week finalizing the design, working out the details, and relaxing for a bit before my friends show up on Friday. And then the real fun will begin. I’m excited.

I apologize for the lack of posts lately. I was in San Francisco for a week to see friends and move out of my apartment, and got back up to Serenity Valley last Wednesday. My garden was still mostly alive, though the water container was still half full, and some of the corn was starting to look a little parched. The soaker lines didn’t seem to be dripping too well, so I went around opening up the pores by squeezing the tube with a pair of pliers. That seemed to work a bit too well, and ended up draining the remaining half a tank (over 20 gallons) in a day and a half. Ooops. I’m finally starting to see more fruits of my labor though, and it looks like I have some zucchini, egg plant, beans and tomatoes on the way.
The hut raising is next week, and I need to order building supplies tomorrow to get it delivered next week, but the design hasn’t been finalize yet. In fact, I haven’t put anything down on “paper” (by which I mean Google SktchUp), though I think I have most of it figured out in my head. I’ve since managed to pick up a couple more like-new vinyl windows at salvage shops (one hanging, one sliding), and also got some very nice scavenged argon-filled Low-E glass from a friends’ dad today. I think I’ll buy one or two more windows that open, but I already have 5 opening windows (all Low-E, double paned), in addition to the 3 aforementioned panes of glass. I’ll also be buying a framed door this time, if I can afford one. Balancing cost vs quality is a challenge, since I want to build something that’ll last and I don’t want to repeat the mistakes from my first hut, but I also need to save as much money as possible. Do I go for the R-5 insulation board for $13, or the R-2.9 ones for $7.50? Is $100 worth the extra insulation? Probably, when I consider the long term benefits. So perhaps I should build a slightly smaller hut, but then, I also don’t want to build yet another hut next year when I decide that this year’s is still too small… On the other hand, the whole point is an experiment in minimalist comfort, so I don’t want to go big just for the sake of it.
The adventure continues…
I’m sitting by a fire, sipping ice cold diet root beer, under a sky full of stars, and life is good. I wish I could stay up here for ever, but I know I can’t. Soon I’ll run out of money, and it’ll get too cold anyway. The new hut might help with the cold, but as for money, well, that’s one thing I can’t seem to make up here (actually, I could technically sell my trees for lumber or firewood, but I don’t think that’d be enough to cover the bills). But for now, life is good, and I am happy.
My irrigation system is basically done. I changed things so that instead of soaker hoses coming off a single garden hose, I got a bunch of Y-splitters and 3/4″ hose to 1/4″ reducers. I have four soaker lines, each with separate valves so I can turn off water to each of the lines separately. The only issue I’m having is that the different lines have vastly different flow rates. For some reason, the section I laid down the first day has a very low flow rate, with mostly completely dry patches, while the section I laid down on the 3rd day is dripping quite profusely. When I was pumping water into the tower today, I momentarily shut off the valve going into the water container, and opened the valve going to the irrigation system (I have a 3-way valve to do that), which in turn had all the valves shut except for the two lines that have low flow rates (again, I can do that since I have valves on each of the four lines), to see if the higher pressure from the pump will help improve the flow rate. It didn’t seem to make a huge difference, but I’ll have a better idea in the morning.
Lately, I’ve been going to town pretty frequently, to get water and supplies for my irrigation system, and the rough surface of the dirt road leading to the county road has been getting to me. I have to drive really slowly to avoid damage to my tires or suspension, and it’s annoying that it takes close to 10 minutes to go just half a mile. So, today, I decided to do something about it. When I headed off to town, I took my shovel with me, and on the way back in, I spent an hour or so filling in the worst parts with dirt and gravel I dug up from the sides of the road. It was another one of those moments where I felt happy and empowered to be able to solve my own problem, instead of having to wait for other people to do it for me.
Now that my garden can water itself, I’m free to leave my property, just in time to attend a wedding party down in San Francisco, and move out of my apartment. I’ve held onto that apartment for way too long, considering how I spent a total of 5 days there during the month of July. The truth is, I wasn’t sure how happy and comfortable I’d be up here, and wanted a place I could go back to if things didn’t work out. I finally decided to pull the plug in mid-July, but of course, I had to give 30 days’ notice, so I’ve been up here all this time while technically paying rent in San Francisco. If my neighbors hadn’t left after the fire and they were still around to water my garden for me, I might’ve gone down there at least once more during the month of July, but, oh well. Ironically, I’ll probably be heading back to the city in another month or two to find a job, but, at least I’ll have saved a couple of months’ rent, and I should be getting my deposit back too.
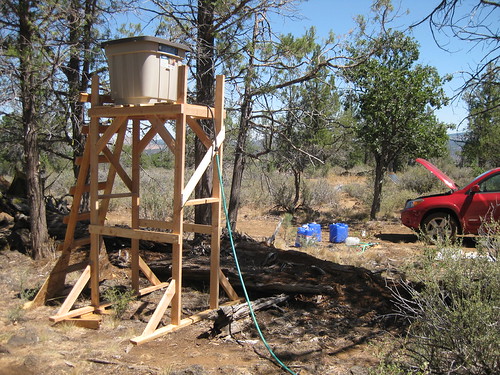
I realized my mistake the first time I went to fill up my water tower. There I was stumbling over rocky terrain, with 56lb of water in each hand. For someone weighing only 140lb, hauling 110lb of water on rough terrain is no fun. Then I had to climb up the ladder pulling and pushing one of the water cubes up with me, and that too, was no fun. My original plan had been to pump the water using a 12V pump, but after my recent solar panel issues, I didn’t have enough power to run the pump. The only available power was in my car, but because I had placed the water tower about 30 yards away from the road, running the pump off my car wasn’t an option.
The solution seemed simple. If the water tower were closer to the road, I wouldn’t have to haul water far, and I’d also be able to run the pump off my car. But, would I be able to move this 8ft tall structure that’s made of a dozen two-by-fours? I considered rolling it end over end, Katamari-style, but that seemed precarious. It then occurred to me that the 6ft long “feet” I’d attached to the bottom of the legs might work as skids, and I’d be able to just drag the whole thing, over rocks and all. I added a couple of diagonal support pieces to reinforce the structure in the axis of movement, then off I went. It turned out to be a lot easier, and managed to find a nice flat patch of ground, about 10ft from the road, between the hut and the garden.
At the new location, pumping water into the water container is really simple. I shut off the drain valve, hook up the drain hose to the pump, hook up the pump to my car battery, open the valve, and away it pumps. It takes a little while to prime, but once it gets going, it’ll empty a 7 gallon water cube in a couple of minutes.
Once I got water up into the tower, I started laying down soaker hoses. I laid down a garden hose down the middle of my garden hose, then stuck barbed 1/4″ hose connectors into it to connect 1/4″ soaker hoses off of it. I used metal wires bent in a u-shape to stake down the hoses, and once I got the hang of it, it went pretty fast.

I’ve had the system running for about a day and a half now, and the biggest problem is the flow rate. It drained about 40 gallons in a day and a half, which is way too fast. I need a full water container (50 gallons) to last me about a week, which should be enough since I’ve been using around 6 gallons a day when watering with a can. I got some valves which might help with the flow rate, but if not, I also got a timer so that I can limit how long/often it runs. Ironically, the flow rate might be high because there’s too much pressure, and this whole time, I was worried about not having enough. Another issue is that, some of the holes I opened in the garden hose might be leaking, so instead of poking holes in the hose, I’m going to use 3/4″ splitters and 3/4″-to-1/4″ reducers instead.
Anyway, with a few adjustments, hopefully I’ll have the garden running itself soon.
