Water Tower 2.0

You might’ve heard about California’s drought. While the rest of the state is figuring out how to use less water, the challenge I’ve had on Serenity Valley this year is the opposite: how to use all the water I have. The 1000 gallon rain barrel I set up last year was full by early February, and was then topped off again in early July thanks to some unseasonable summer showers. Add the 300 gallons in my other tank, and I’ve got 1300 gallons to play with this year. Granted, it isn’t much water at all, but using it up has turned out to be a greater challenge than I expected.

I’m not there much so most of the water is intended to be used to irrigate my garden, which has turned out to be less than trivial. I initially thought I could hook up my drip irrigation lines to the 1000 gallon tank via a timer, but it turns out the timer all but kills the pressure, so the drip heads don’t work consistently, or at all. Using the 50 gallon tank on the “water tower” solves this problem because I can set up the irrigation timer several feet off the ground, which generates enough pressure through gravity. However, since I need to transfer water from the bigger tank to the water tower myself (using an electric pump), those 50 gallons need to last while I’m gone — which can be as long as a month.

One option was to build an automated system to transfer water from the bigger tanks to the water tower. But, automated things are prone to fail, and if the system failed, the 50 gallon reservoir wouldn’t last very long. Plus, the “water tower” was starting to show some age, being made of untreated 2x4s and having been exposed to the elements since 2010.

So, clearly, what I needed was a bigger, better water tower. I’ll let the pictures tell the story…

IMG_3821.JPG

My 1000 gallon tank was nearly full by early February. Some off-season summer rain then topped it off again in early July… Need to use more water!

IMG_4064.JPG

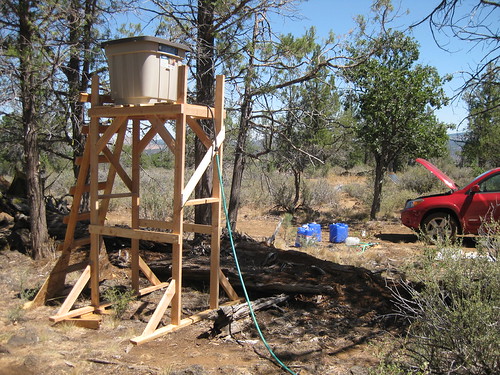
Experimenting with 2 irrigation lines set on separate timers. One was set to go every 7 days, the other every 3 days. Also, Water Tower 1.0 still on active duty!

IMG_4146.JPG

Garden ’15. This year I have: 2 grape plants, 2 potato bushes, 3 strawberry clusters, one pepper, one cucumber, 2 mystery squashes, 2 kabocha squashes, 2 melons, and 2 tomatoes.

IMG_4143.JPG

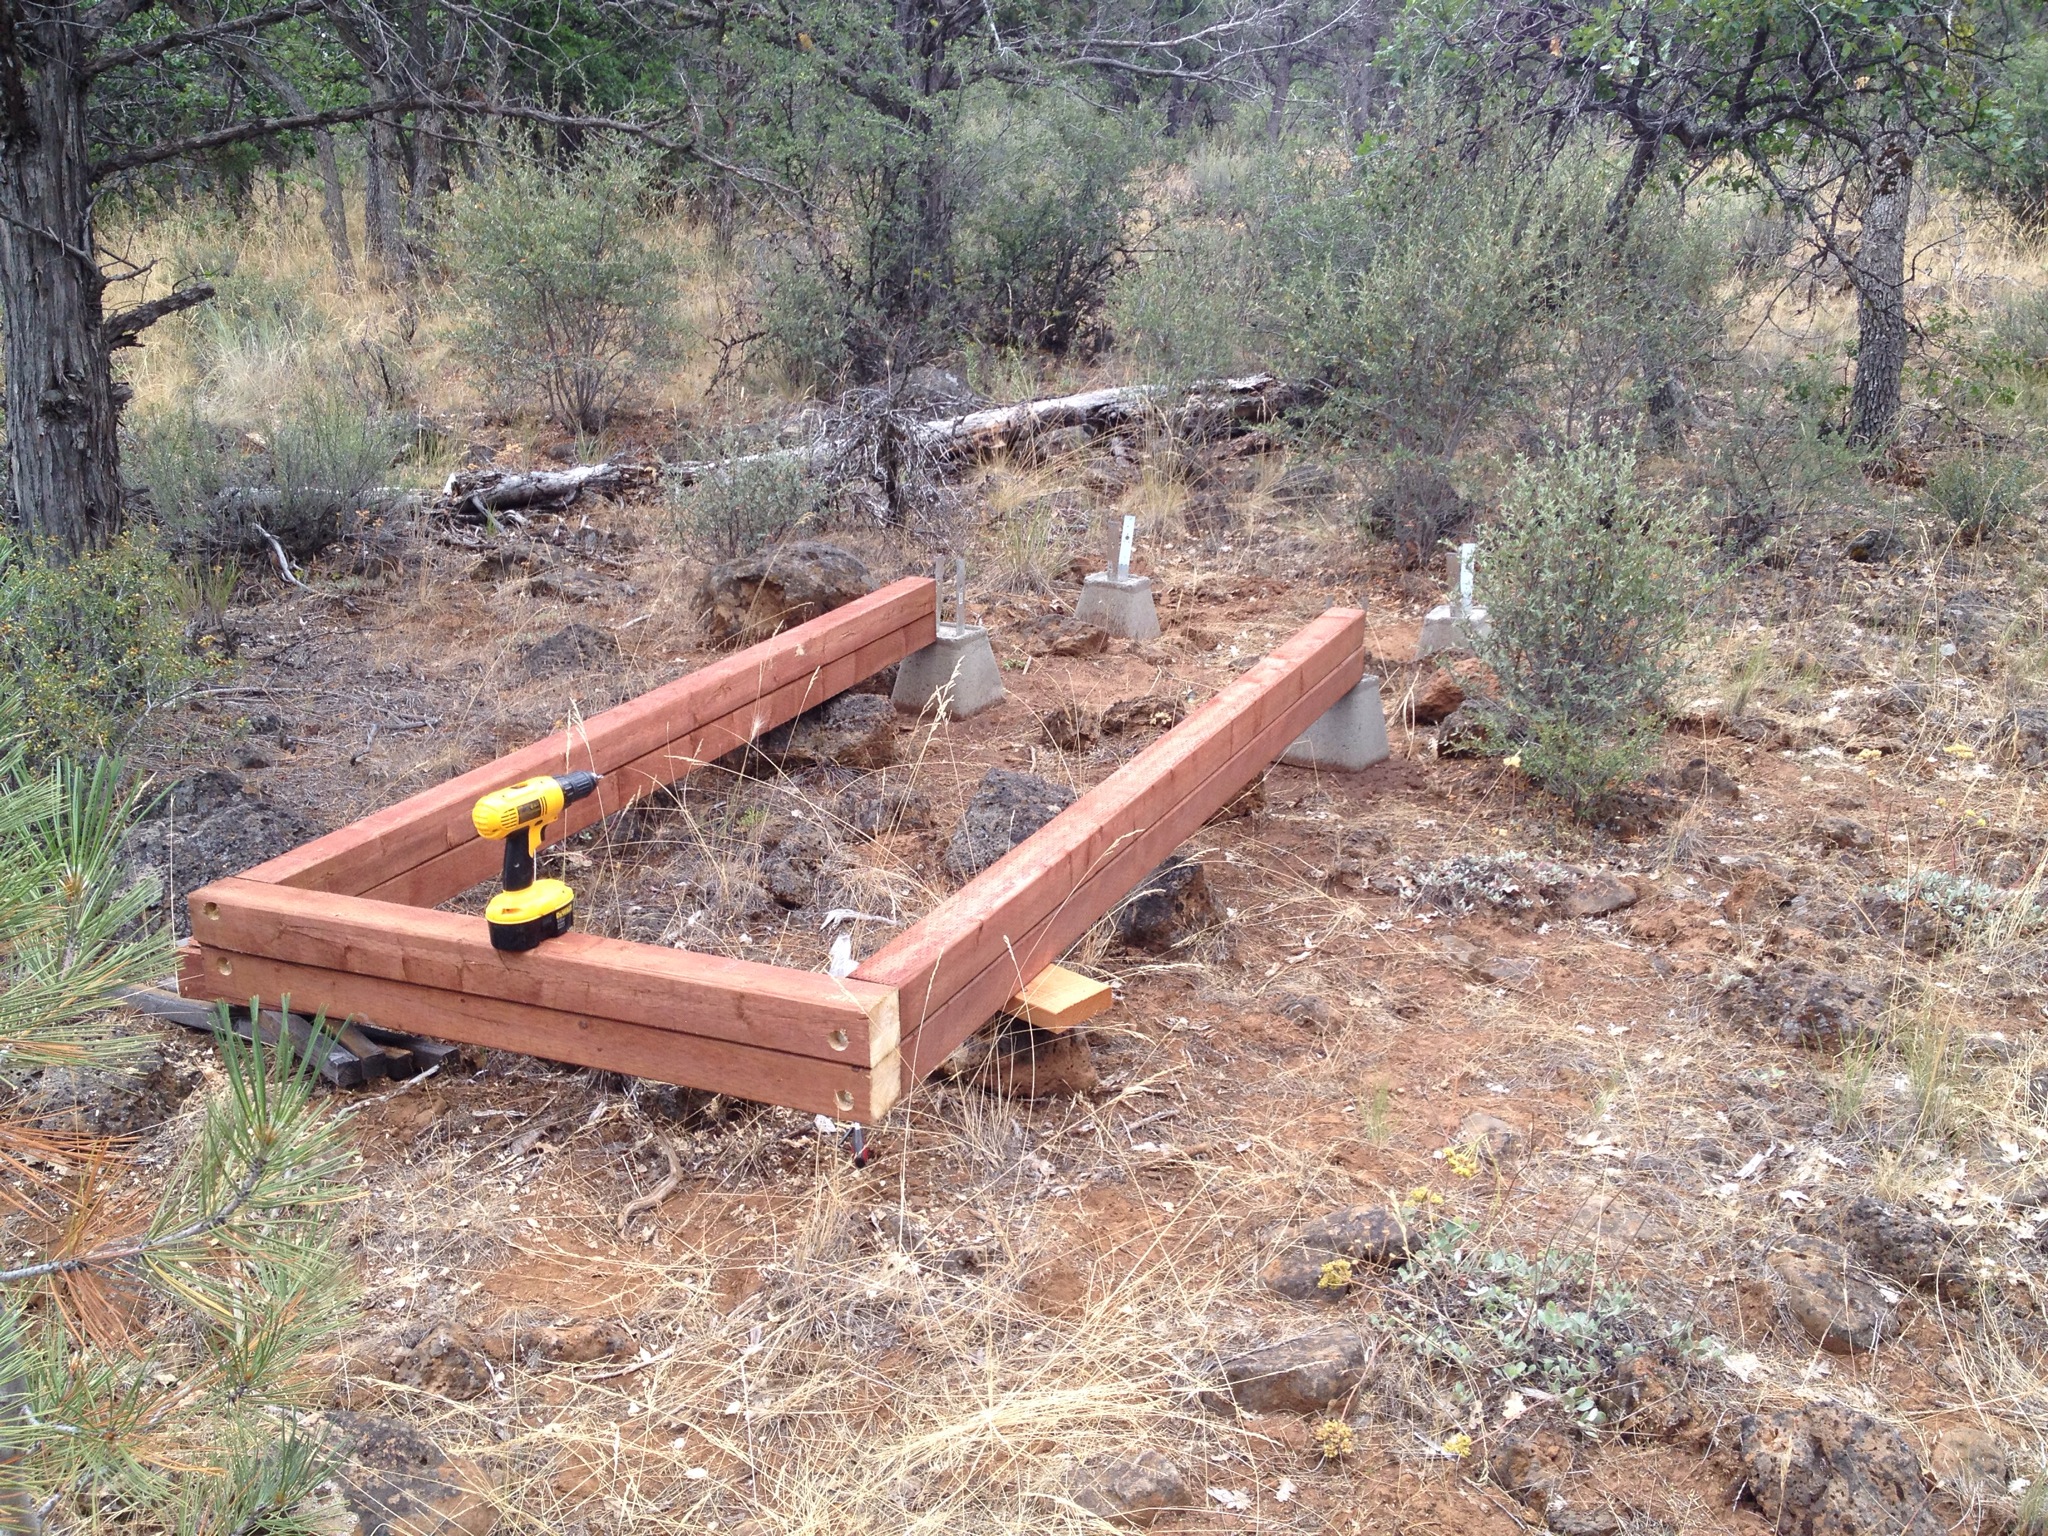
Water Tower 2.0 under construction…

IMG_4144.JPG

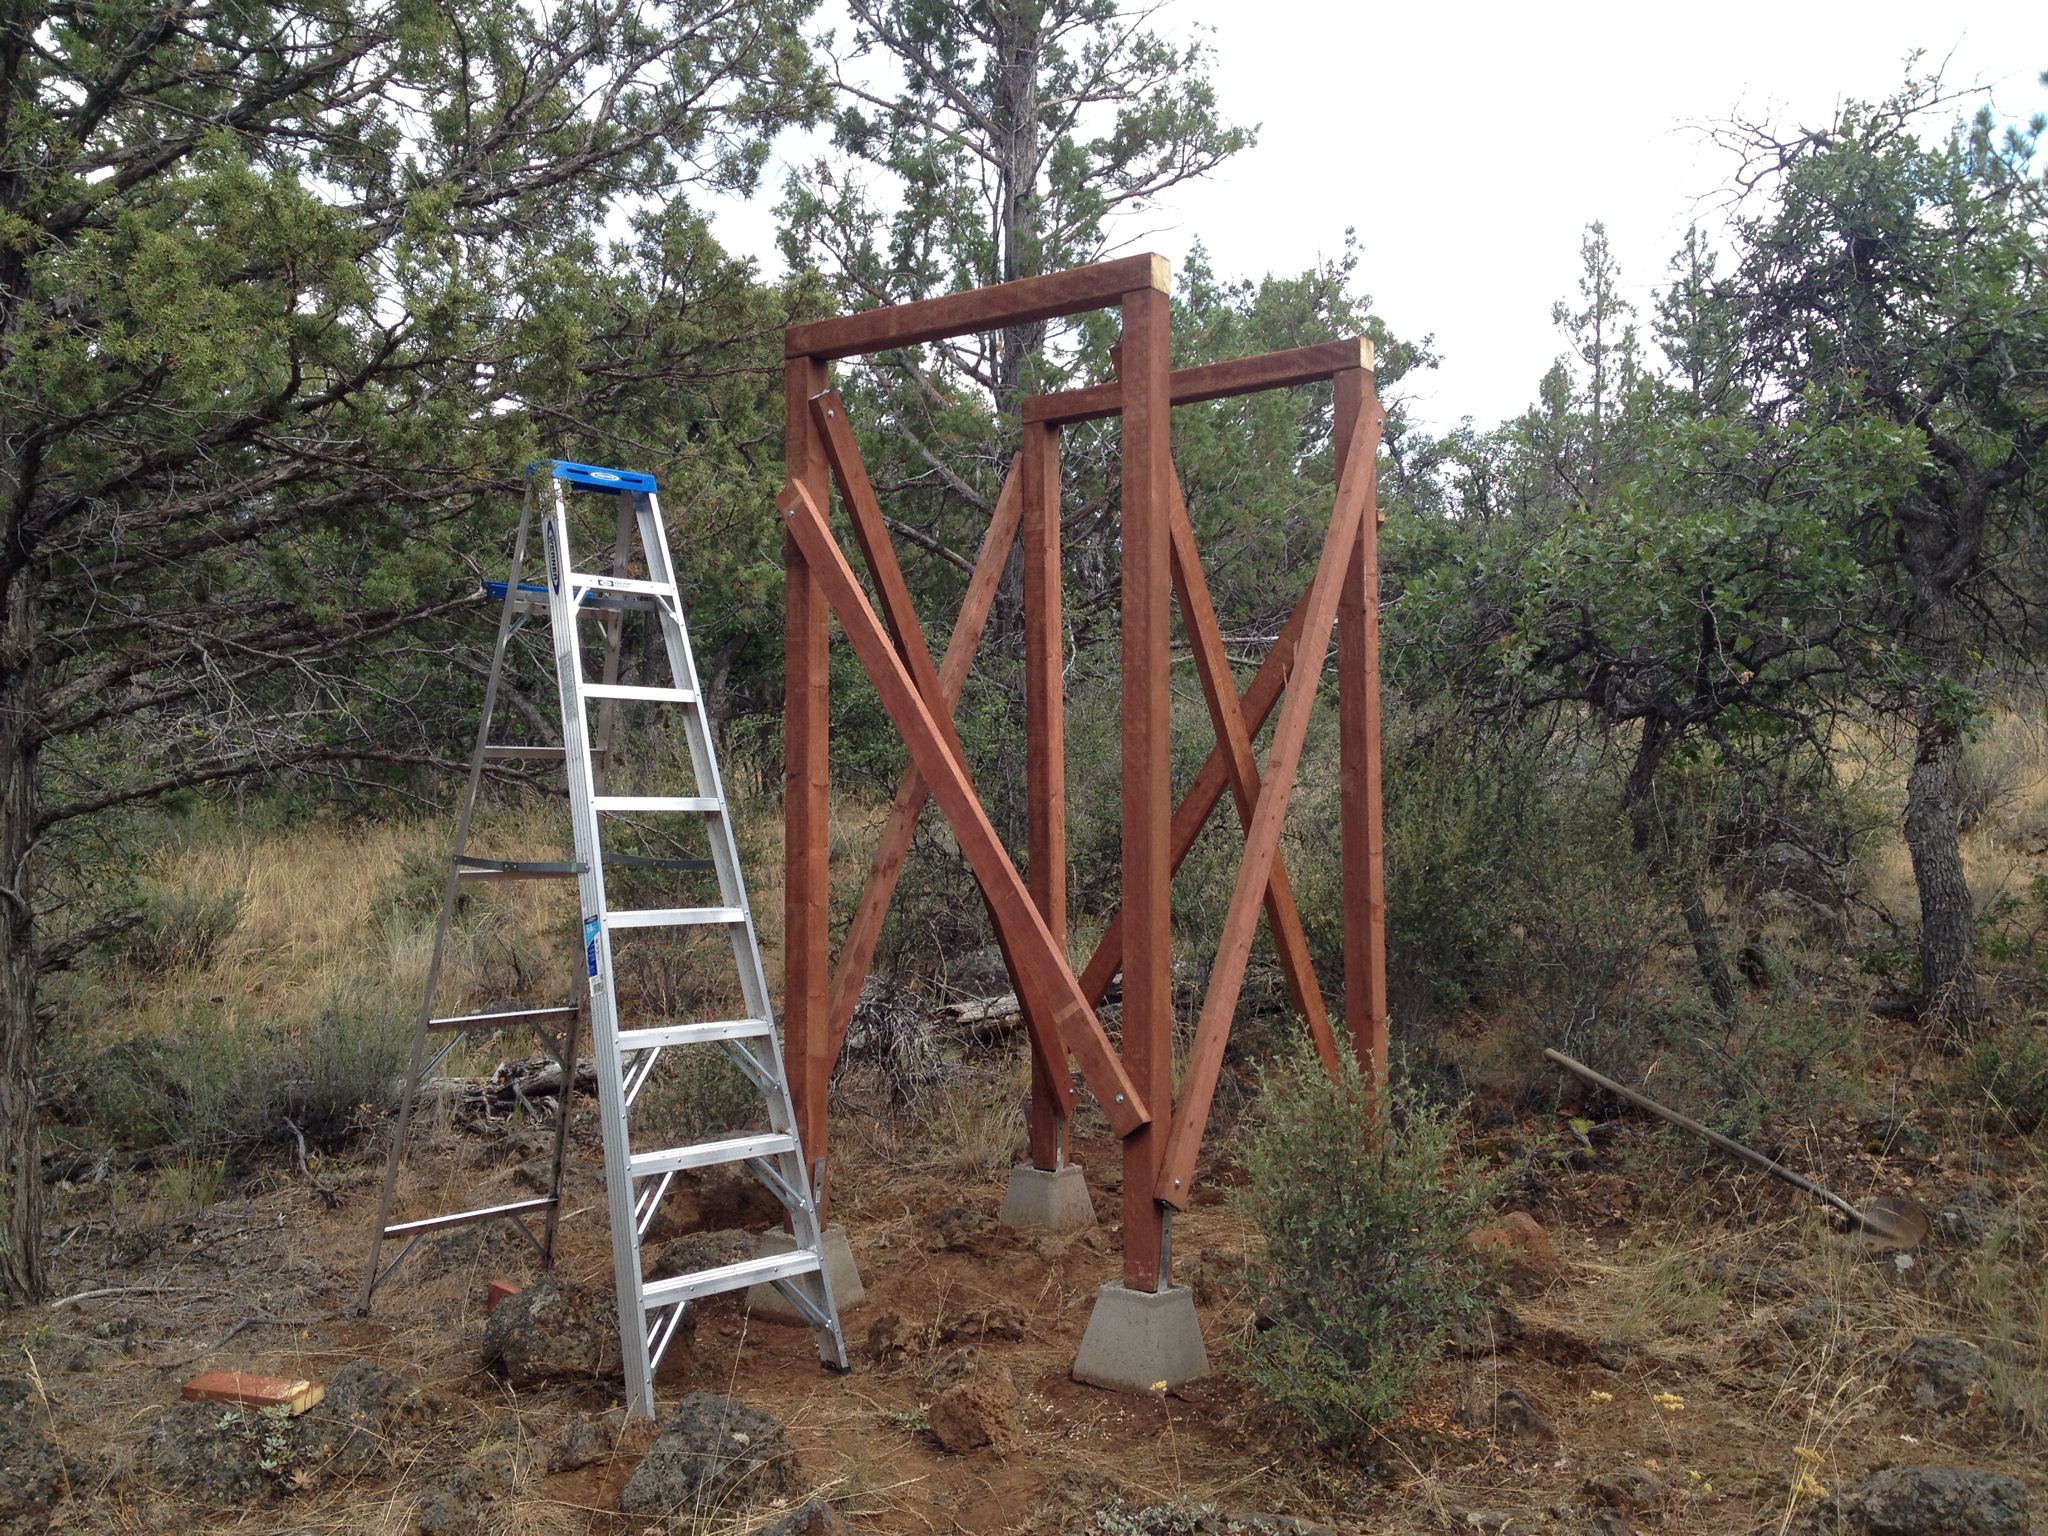
Water Tower 2.0, standing. The posts are 8ft tall, so the top is about 9ft off the ground. This is also probably the sturdiest structure I’ve ever built…

IMG_4166.JPG

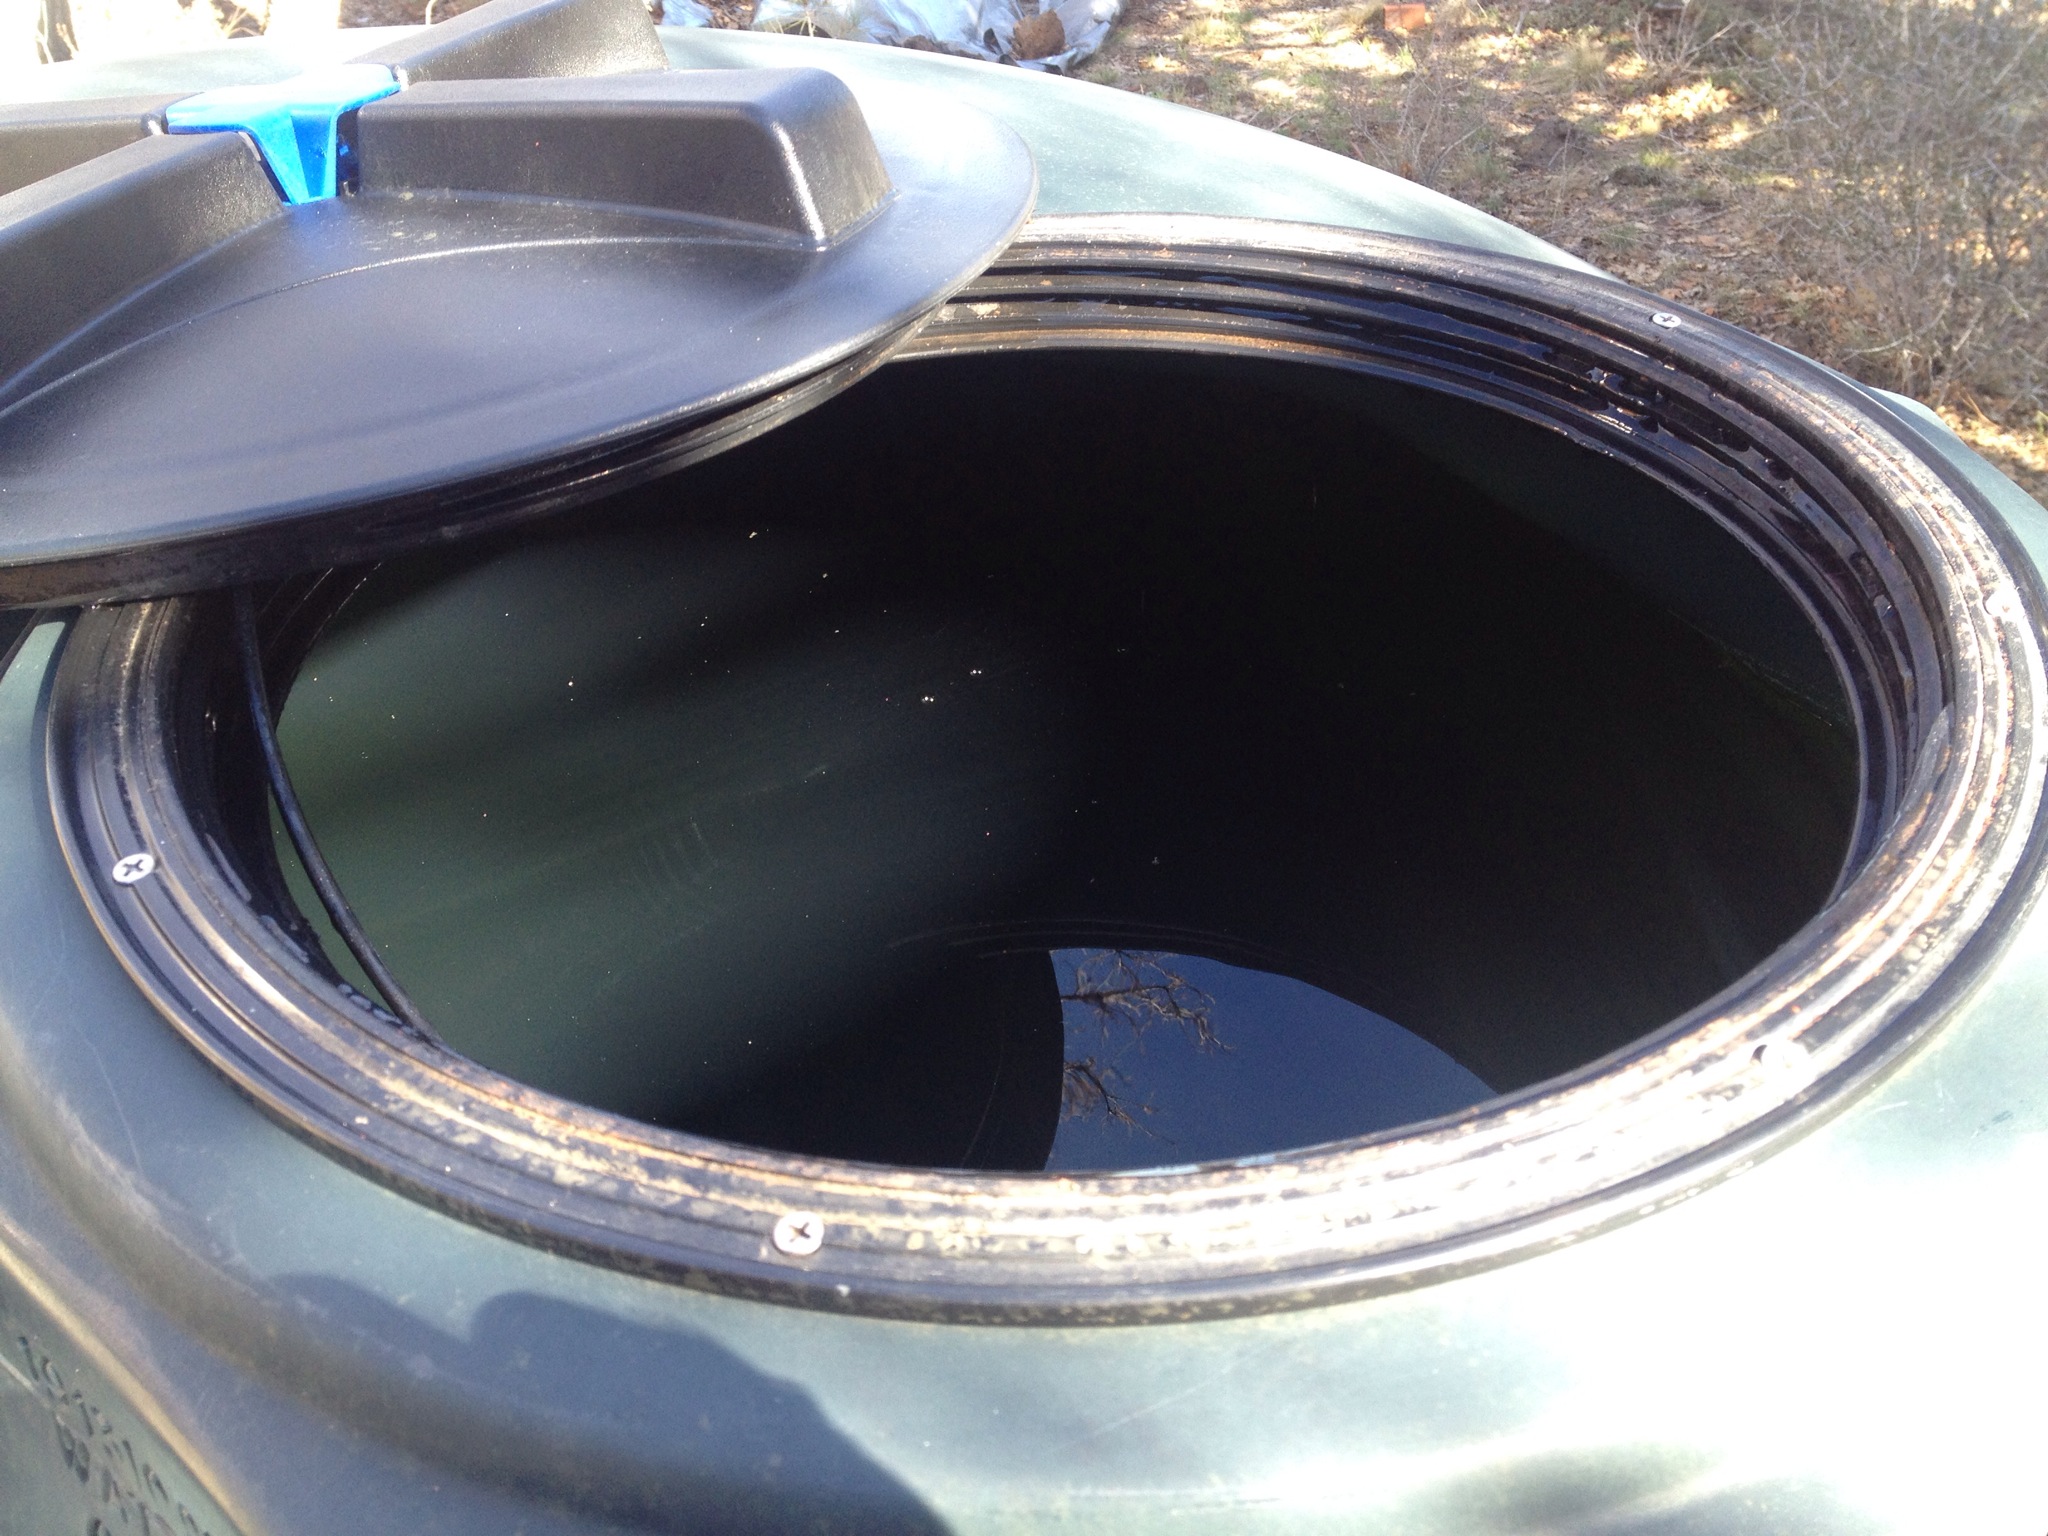
Trash bins make relatively inexpensive exterior-grade water containers. All you need are some bulkhead unions and hose adapters.

IMG_4167.JPG

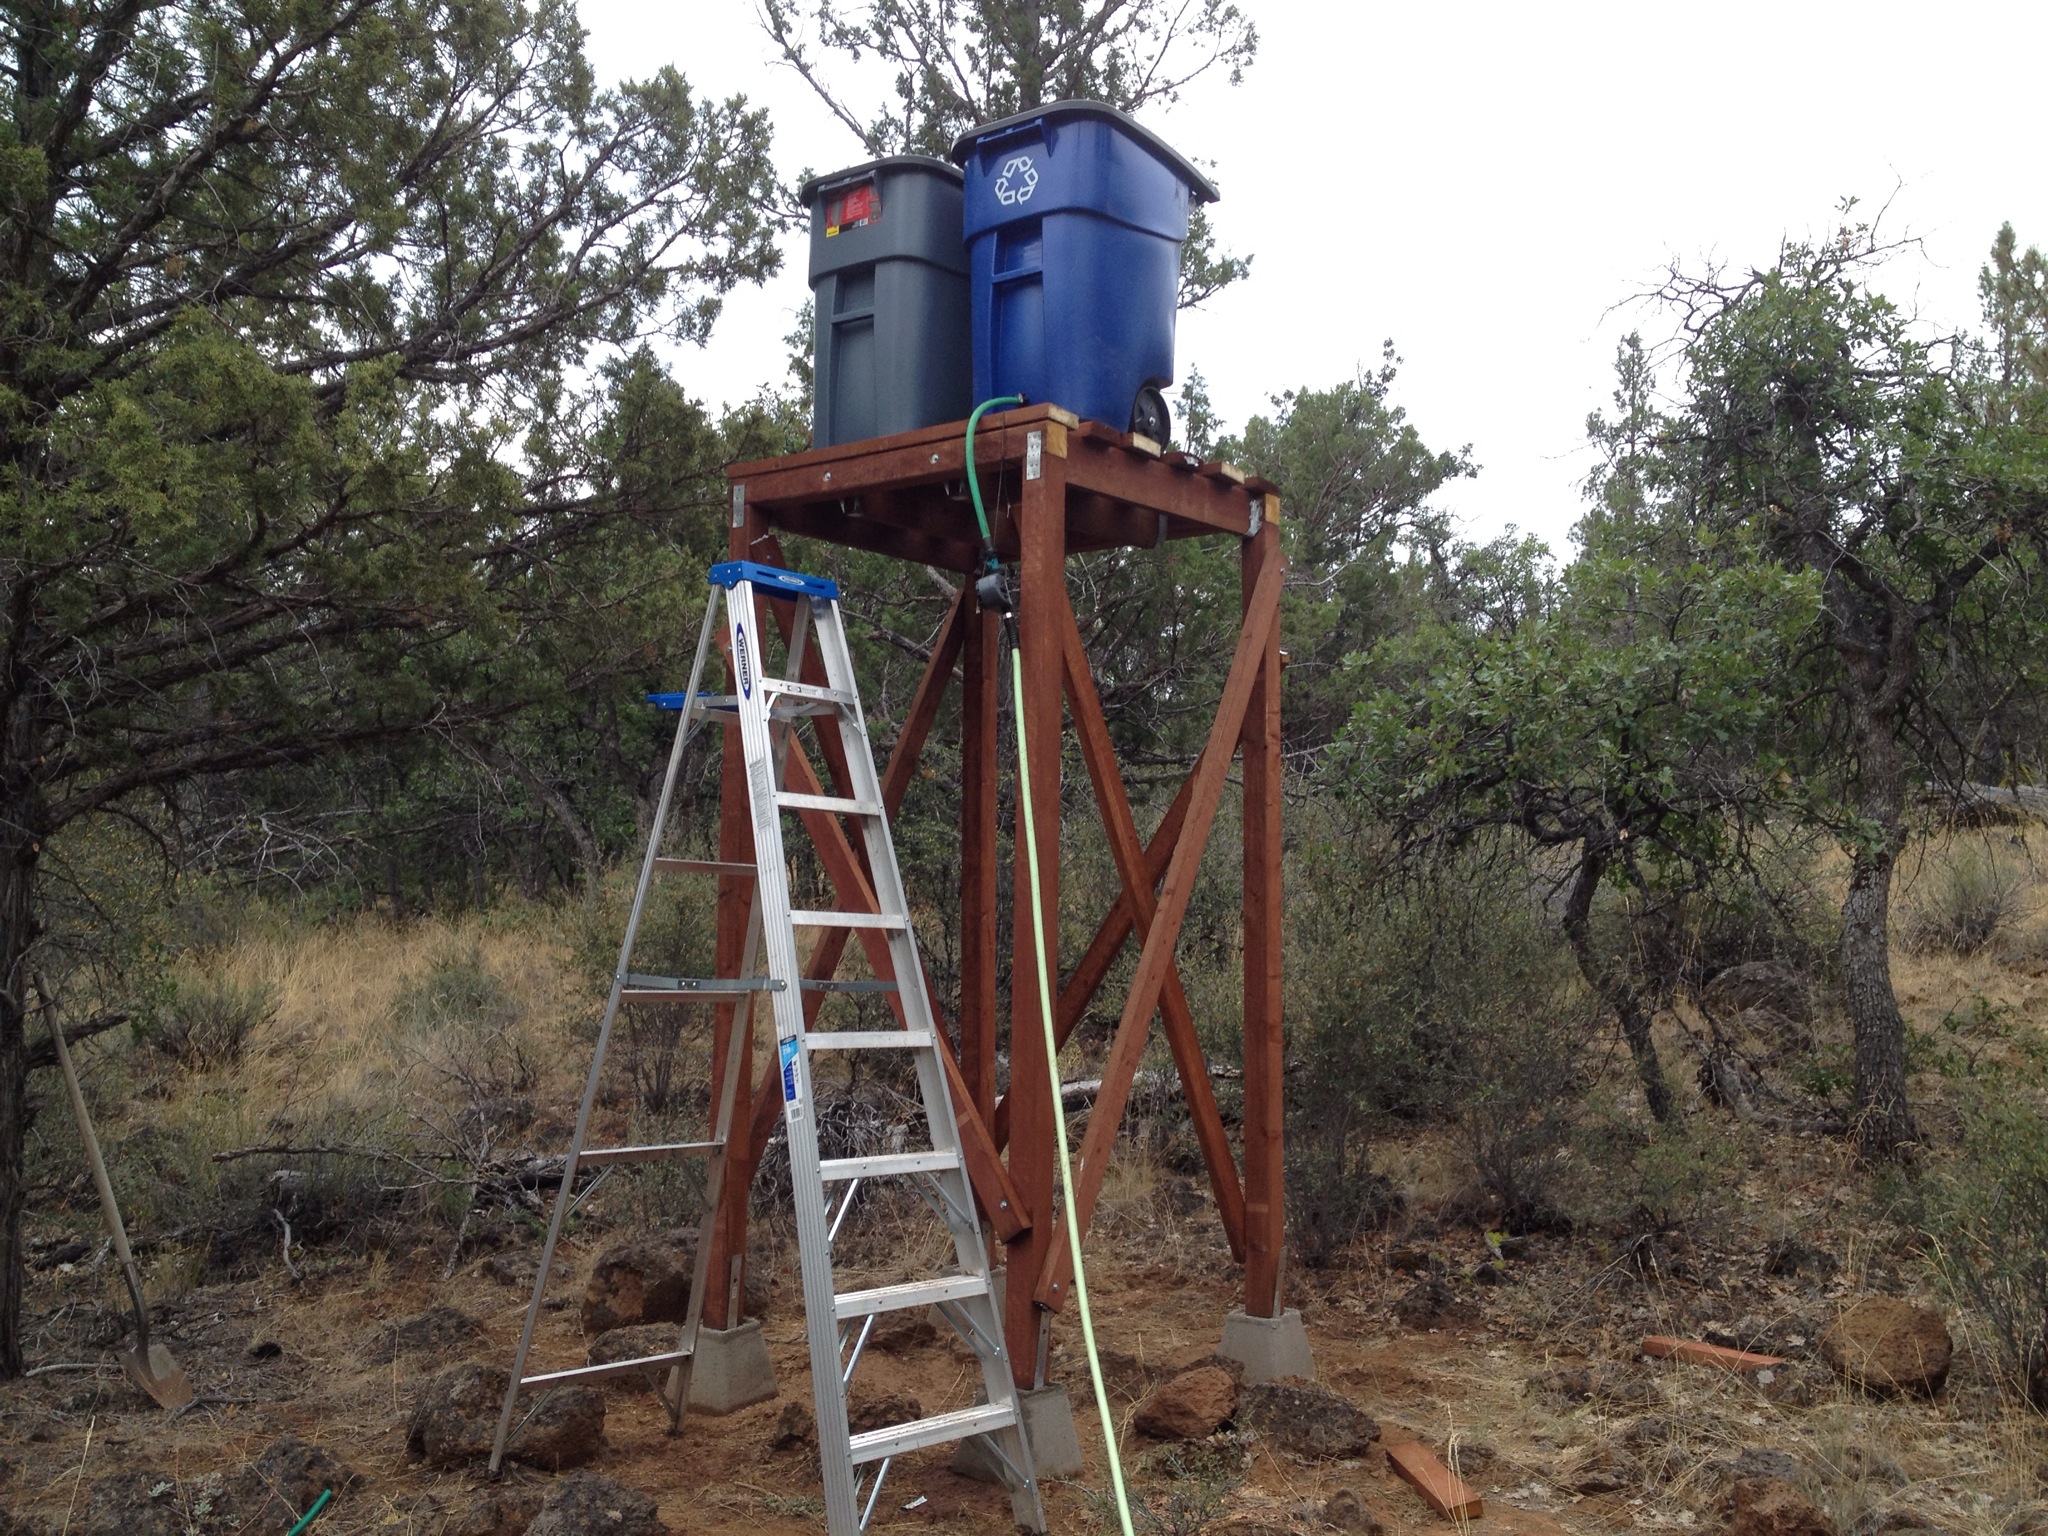
Trash bins never looked so good! The irrigation timer is a full 8ft off the ground, which drives plenty of pressure to the drip irrigation heads. Some day I might replace the bins and upgrade to a 200 gallon tank, if I have confidence it’ll support 1600lb of weight.

News from Serenity Valley, June 2014

deed

I can’t believe it’s already June. Time seems to be flying by faster and faster these days. I wonder what they’re putting in the water… Anyway, it’s time for a long over-due update, and I’ve got some big news!

The first piece of news is, as you can see in the photo above, I finally got my property deeds! I’d sent in my last payment last summer, but it took a while for the deeds to get to me, probably because I hadn’t kept the seller up to date on my mailing address. But, I have them now, and the property is officially mine for ever and ever. It feels great to have that taken care of. For as long as I can afford to pay $500/year in property taxes, I’ll have a patch of ground I can call home.

The other piece of big news is that I quit my job (again)! I’d been working in San Francisco as the Chief Technology Officer of a startup for the last couple of years, and recently decided it was time to move on to my next adventure. So what’s my next adventure, you ask? Well, that’ll have to be another post, but for now, I’ll just say that I anticipate being able to spend slightly more time on my property, and having more time for blog posts, and definitely more adventures (for starters, I went on a 7-day 85-mile backcountry backpacking trip!).

IMG_3120

As far as other updates go, the rain barrel I set up late last year (and finally hooked up earlier this year) managed to capture over 800 gallons of water off my cabin roof, despite it being a severe draught year. So, I decided to plant another tree (the cherry tree I planted a couple of years ago died last year). This time I opted for an apricot tree, and I’m fairly confident I’ll be able to keep it alive, assuming the irrigation system works properly while I’m away.

One thing I’ve been trying to figure out, is how to make decent dirt. I’d like to grow more plants and vegetables in the future, and I’d like to avoid buying soil if possible. But the native soil is this dusty red dirt that compacts into a hard lump when moistened and dried, and hardly has the texture of soil. After some experimentation, I’ve found that mixing a naturally occurring mulch-like substance from a decomposing tree along with sand into the native dirt produces something that has the texture and water absorption properties of proper gardening soil. I’m currently experimentally growing a couple of squash plants and a tomato plant in this home-made soil (with a small amount of commercial planting soil around the roots), so we’ll see how they do.

Other than that, I’ve got a bunch of projects or project ideas, so I’ll keep y’all posted on those as/if I make progress!

I planted a cherry tree!

On a recent trip to Serenity Valley, I planted a cherry tree. Now, planting a fruit tree in the high desert, where there is no rain nor running water for half the year, may seem foolish. And maybe it is. But I planted it anyway. I think of it as an act of commitment; I’ve planted a tree, now I have to keep it alive.

Water

A couple of recent developments make this decision slightly less foolish than it may sound at first. One is that I got a 300 gallon water tank, which I plan on hooking up to my gutters to collect run-off this Winter / Spring. There’s usually 20-30 inches of precipitation in the wet months, and even if I manage to collect 10″ of that, I should be able to harvest around 1000 gallons off my cabin roof alone. (If you want the math, it’s 0.6 gal / 1″ of precipitation / 1 sqft of surface area. So, 0.6 gal * 10″ of precipitation * 170 sqft roof = ~1020 gallons.) If my math is right, my 300 gallon tank won’t capture all the available water, so I’ll probably add more. The other recent development is that I (or, rather, a neighbor) found a couple of sources of water closer than the gas station in town, some 17 miles away. It turns out there’s a volunteer fire station 3 miles down the road that has its own well, where locals can take as much water as they want for a very small monthly fee. There’s also apparently a local who owns a water tanker, and will deliver water (if he likes you). So, between my rain barrels and an abundant water source just 3 miles away, I’m fairly confident I can keep the cherry tree watered for the foreseeable future.

Selection

So, why a cherry tree? Because I like cherries. Well, first of all, not all fruit trees can survive the cold winters we sometimes experience up here in the mountains. While not common, temperatures can drop down into the negative (Fahrenheit), with record lows down into the -20Fs. So anything that can’t withstand -20F won’t make the cut. At the local hardware store, that narrowed the selection down to: apricots, apples, and cherries. Of those, I like cherries the best. I suppose apples might be more versatile, since you can make cider and apple sauce, use them for baking, and the fruit lasts a long time if kept cool. (Hmm… maybe my next tree will be an apple tree.)

The next step was to choose a variant. They had a few options, including famous sweet variants like the Rainier cherry, but all the sweet variants need pollinators (i.e. another cherry tree). So I ended up picking a Montmorency cherry tree, which is a self-pollinator and semi-dwarf; two characteristics that should work well for me. On the other hand, the sour fruit that the Montmorency bears will only be good for canning or baking. It’s a bummer I won’t get to eat sweet fruit right off the tree, but seeing how cherries have a short shelf-life, having a variant suitable for preservation probably isn’t such a bad idea.

Planting

Planting a tree isn’t terribly exciting in and of itself. Digging the hole ended up being a lot of work because I encountered a rock-hard layer of clay that I decided to try and bust up  — by repeatedly driving a pitch-fork into it with a sledge hammer. A pick-axe probably would’ve made things easier, but I didn’t have one.

Once I had the tree planted, though, I decided to try something new. I’d read that Native Americans and others living in arid regions were known to mulch their plants using rocks. The theory is that the rocks would slow moisture evaporation, dampen extreme temperatures by acting as a thermal mass, and possibly also improve the soil by slowly leeching minerals. I know that moisture evaporation and extreme temperatures are a concern where I am, so I decided to give it a shot. I also placed 3 drip irrigation heads (of which two you can see in the photo) between the rocks. Incidentally, the drip irrigation is the same gravity-fed system hooked up to my water tower that I set up in previous years, which keeps my garden watered while I’m away with the help of a garden timer. Finally, I covered the whole thing with straw to provide further shade from the harsh sumer sun and cold winter frost.

So, we’ll see how that goes. If all goes well, we’ll start seeing cherries in a couple of years…

Journal: September 13, 2010

hut 2.0 with rafters

This past week since returning from Burning Man hasn’t been too productive. It rained all day Wednesday and well into Thursday morning, which, though highly unusual for this time of year, and did rob me of my ability to heat up my solar shower, did relieve me of any concerns about irrigating my garden for the week. On Thursday, the temperature barely rose above 60F, and dropped to around 36F at night. I was hoping the growing season would last longer, but it seems likely that I’ll see frost in the not too distant future.

The sun finally revealed itself unabated on Friday, warming temperatures up to a balmy 70F. I took advantage of the nice weather to start working on the rafters. I’m using 2x4s, most of which were donated to me by Camp Warp Zone at Burning Man, and were once part of their shade structure (I love recycling lumber, and in addition to those 2x4s, Hut 2.0 contains pieces of my old bed as well). One thing that had me thinking a bit, was the spacing between the rafters. Hut 1.0 has trusses that are a gaping 36″ apart, with a 30 degree pitch, and it seemed to have done okay for this past winter (not sure how much snowfall there was). My original design for Hut 2.0 had the rafters spaced 24″ apart, but I wondered if I should do 16″ instead. I did a little research online, and found some data that seem to indicate that 24″ would be sufficient for my relatively short span and 45 degree pitch, so I decided to stick to my plans. I also paid closer attention to the 2x4s as I was cutting them and putting them up, to try and keep knots that can compromise strength away from the bottom edge, which isn’t something I’ve always done (but probably should). All in all, the whole task ended up being much easier than I’d anticipated, even working alone. After cutting each rafter, I just had to stick rafter hangers on the top-end, hammer in the hurricane ties onto the top edge of the walls where the rafters would sit, then it was just a matter of hammering in the hangers into the roof beam. (Here’s a close-up of the rafters + knee walls.)

The next step is to add a couple of diagonals to the roof beam to firm it up, then start laying on the roofing. I’m just going to use OSB, then lay insulation on top of that, then Ondura roofing panels will go on top of that. I’m planning on completely finishing the roof before working on the lower parts of the hut, since it’ll be easier to hang scaffolding off the sides of the structure if the walls aren’t there yet. Also, now that it’s rained hard twice, it seems like getting the roof done sooner would generally be a good idea.

In other news, my garden is in full bloom. Yellow squash that were finger length when I left for Burning Man had ballooned into giant fruit almost the size of my forearm. I’ve also got more green beans, and a decently sized cucumber. I also have a few egg plants on the way, and giant green tomatoes that have stubbornly refused to ripen so far, but hopefully will soon. The corn has also matured, but the ears are quite small. Planting corn this year was definitely a mistake, though they did a great job of providing shade to the beans, which was a minor unexpected benefit (I alternated rows of corn and beans, and the rows of beans that got good shade from the corn did much better than the rows that were more exposed).

As winds start blowing (or raining) hints of autumn through my camp, I’m increasingly thinking more about my next steps. I’m starting to run low on cash, so I’m rapidly approaching a point where I need to make a decision. Do I go back to work in the city, or do I have other options? We’ll find out soon…

veggies!

Update: August 26, 2010

A quick update while I’m waiting for my laundry to finish…

Progress on Hut 2.0 has been slow. I’ll be honest. Working alone means every task requires at least double the effort, which in turn requires double the motivation. Which means everything takes at least four times as long, or, if it’s 96F in the shade like it was yesterday, about 16x as long. So… since my hut raisers left, I’ve gotten woefully little done. I’ve added diagonals to all the 4×4 posts, put up a couple of posts that’ll hold the roof beam off of which the rafters will hang, cut the roof beam, measured out the places where the rafters will go… and that’s about it. Oh, and I read a book.

In other news, the garden is starting to mature, and I’m slowly starting to harvest some vegetables. So far, I’ve gotten some decent sized green beans, and it looks like I’ll have a yellow crooked neck squash ready for harvest in another couple of days, with plenty more on the way. I have an egg plant on the way too, though I’m not sure how big it’ll be. The tomatoes are still green, and taking their time ripening, but they’ll get there soon, presumably. I also just noticed today that I have some cucumbers on the way, which is exciting. The corn is also maturing, though the stalks aren’t nearly as tall as they should be, so we’ll see how big the cobs will be. Over all, it seems like most of my vegetables will be small in size and yield, but I’m happy to be getting anything, seeing how this is my first year growing a garden. I’ve learned a lot, and perhaps I’ll do better next year.

Next week, I’m off to Burning Man, which basically means packing up my camp and bringing it to the desert in Nevada. I wasn’t planning on going, but decided a few days ago that it’d be fun to hang out around crazy people for a change. I’m planning to organize an ad hoc gathering at my camp for people who want to (or think they want to) go live in the woods and/or build huts and cabins, to talk about my experiences and share information. We’ll see if anyone shows up. If there are any Burners out there reading this blog, keep an eye out for a flier on that board near center camp where such things get posted.

Dripping

I realized my mistake the first time I went to fill up my water tower. There I was stumbling over rocky terrain, with 56lb of water in each hand. For someone weighing only 140lb, hauling 110lb of water on rough terrain is no fun. Then I had to climb up the ladder pulling and pushing one of the water cubes up with me, and that too, was no fun. My original plan had been to pump the water using a 12V pump, but after my recent solar panel issues, I didn’t have enough power to run the pump. The only available power was in my car, but because I had placed the water tower about 30 yards away from the road, running the pump off my car wasn’t an option.

The solution seemed simple. If the water tower were closer to the road, I wouldn’t have to haul water far, and I’d also be able to run the pump off my car. But, would I be able to move this 8ft tall structure that’s made of a dozen two-by-fours? I considered rolling it end over end, Katamari-style, but that seemed precarious. It then occurred to me that the 6ft long “feet” I’d attached to the bottom of the legs might work as skids, and I’d be able to just drag the whole thing, over rocks and all. I added a couple of diagonal support pieces to reinforce the structure in the axis of movement, then off I went. It turned out to be a lot easier, and managed to find a nice flat patch of ground, about 10ft from the road, between the hut and the garden.

At the new location, pumping water into the water container is really simple. I shut off the drain valve, hook up the drain hose to the pump, hook up the pump to my car battery, open the valve, and away it pumps. It takes a little while to prime, but once it gets going, it’ll empty a 7 gallon water cube in a couple of minutes.

Once I got water up into the tower, I started laying down soaker hoses. I laid down a garden hose down the middle of my garden hose, then stuck barbed 1/4″ hose connectors into it to connect 1/4″ soaker hoses off of it. I used metal wires bent in a u-shape to stake down the hoses, and once I got the hang of it, it went pretty fast.

I’ve had the system running for about a day and a half now, and the biggest problem is the flow rate. It drained about 40 gallons in a day and a half, which is way too fast. I need a full water container (50 gallons) to last me about a week, which should be enough since I’ve been using around 6 gallons a day when watering with a can. I got some valves which might help with the flow rate, but if not, I also got a timer so that I can limit how long/often it runs. Ironically, the flow rate might be high because there’s too much pressure, and this whole time, I was worried about not having enough. Another issue is that, some of the holes I opened in the garden hose might be leaking, so instead of poking holes in the hose, I’m going to use 3/4″ splitters and 3/4″-to-1/4″ reducers instead.

Anyway, with a few adjustments, hopefully I’ll have the garden running itself soon.

Water tower! Bears! ‘n stuff…

Water Tower

I told myself that I’d reward myself with a pizza and internet if I finished my water tower, and I did, so here I am, on the internets (the pizza’s already in my belly).

I decided to build essentially a free-standing platform to perch the water container on. The platform measures 4ft by 30 inches, but the legs have cross pieces to make the base effectively 4ft by 6ft for additional stability. I did most of the work in the shade, under a nice leafy oak grove next to my hut, but since the final product would be too heavy for me to move, I built it in components, which I then assembled at the final site. The tower isn’t quite square, and the ground isn’t quite level, so it’s leaning a bit, but the center of gravity is well within the expanded base, so I’m not terribly worried. I also used 2x4s for the legs, instead of 4x4s, since the water container I ended up using only has a 50 gallon capacity, and would only weigh up to 400lb. Tomorrow I’ll be hooking up all the hoses, so tonight should be the last time I have to water my garden out of a watering can…

The temperature’s finally cooled down this week, after last week’s 100F+ days (hottest day was Friday, when it was 99F in the shade). It’s been cool enough in the shade, that I’ve been able to finally do some shooting on my 100 yard range. I’ve always wanted to be able to shoot my match rifle on my own property, and now I have. Whereas in the city, I’d have to load all my gear into my car, then drive 30-45 minutes to get to the range, here, I just have to pick up my rifle and walk less than 10 minutes. It’s pretty sweet. Of course, now I don’t have much of an excuse for not shooting more and improving my scores…

The other exciting discovery this week has been bear tracks on the dirt road going through my camp. The prints measure about 9 inches heel to toe, and are about 5 inches across at its widest point. The prints start about 40 yards west of my hut, go past my hut, and ends about a 120 yards down the road. They go over tire marks I left when I headed out for town on Monday, but are under where I parked that night, so the bear passed through while I was away. I think the bears around here are black bears, which I hear are pretty shy, unless they’ve been spoiled by human foods (which, I don’t think the bears around here have). So, I don’t think it’s entirely an accident that he/she paid a visit while I was gone.

Irrigation hell, and other news…

Garden hoses are stupid. If I’d invented garden hoses, they’d have female connectors on both ends, and anything that isn’t a hose would have male connectors. The reality today, though, is that garden hoses have a male connector on one end, and a female connector on the other, while practically all non-hose components have male connectors. So, if you want to connect two non-hose components with a hose, you’re screwed (or, unscrewed, as the case may be). It’d be less of an issue if they had a coupler that’d connect two male connectors, but I can’t seem to find such a thing anywhere. *sigh* Instead, I got a female connector “repair kit”, so I’m going cut off the male connector from one of my hoses to replace it with a female connector, and make a hose with female connectors on both ends, the way God should’ve intended them to be. While I’m ranting about garden hoses, WTF is the deal with garden hose connectors containing lead? Are they trying to kill us?

I admit, I’m a complete idiot when it comes to plumbing. I’m like the opposite of this XKCD comic. I can write software, I can sorta build stuff out of lumber, but when it comes to water through tubes, I know nothing. But, I’m learning, and hopefully I have all the right parts to make some kind of contraption. In my defense, what I’m doing is relatively rare, I think. Most irrigation solutions out there assume you have, you know, water. Out of a spigot. With pressure. I’m sure if I did research, I’d find someone who did exactly what I’m trying to do, but then, what’s the fun in that?

The picture you see here was my first experiment. I got a garden hose, and used a 3/4″-hose-to 1/4″-tube adapter to connect a 1/4″ soaker hose to it. I then siphoned water out of a water carrier perched on top of my car, to see if the water pressure would be enough to force water out of the soaker hose. Well, it failed, quite miserably, but I claim the experiment a success because I learned a lot. The main issue I saw was that the adapter was leaky, and most of my water (and pressure, with it) was leaking out of the adapter. The adapter was also faulty in that, the inside diameter of the 1/4″ end was too small for the soaker hose, so water also leaked from there too.

My second experiment was to use a different method for attaching the 1/4″ soaker hose to my garden hose. I used these 1/4″-to-1/4″ barbed connectors, and poked one end into the middle of my garden hose through a tiny hole I drilled in it, and the other end into the 1/4″ soaker hose. That connection worked much better than the adapter. But, I noticed two problems with this. One was that the soaker hose only released water from a few points, separated by over a foot in places. The other thing I realized was that siphoning is unreliable. I guess air bubbles somehow form or get into the hose, and stops the flow of water.

So, I figured I needed a water container that had a 3/4″ hose connector at the bottom, instead of relying on siphoning action. I was originally thinking of using my 55 gallon drum, but the threading on the lid is kinda weird, so I wasn’t sure how to get a 3/4″ hose connector onto it. So, today, I came out to Redding, hoping to find a water container that already had a 3/4″ connector at the bottom, and some kind of vent up top. I first stopped by J and J Pumps, but the smallest containers they had were over 300 gallons, and cost a little under $300. The guy I talked to suggested that I check out Tractor Supply, and there, I found a 50 gallon rain barrel on clearance for $50 (pictured right). It’s got a 3/4″ male connector at the bottom, and a hole at top, as well as a mesh-covered opening in the lid. I’ll be pumping water into the hole at the top, using a 12V water pump, out of the 7 gallon water cubes I use to haul water from town. From there, the water will be fed into my soaker hoses, attached to a garden hose as the main line, by gravity.

***

In other news, I woke up yesterday to the rumbling of thunder. I listening to it for a while, then jumped awake. Thunder (usually) means rain. My roof is currently not water proof. Oh no! I hastily put up a couple more 1×3 cross-pieces on the roof, and started laying down asphalt impregnated paper. Ominous dark clouds hung in the sky. The rumbling of the thunder continued incessantly, gradually approaching closer, like artillery fire of an invading army. Put up the barricades! Unfortunately, I didn’t have enough tar paper. I’d used up most of the roll wrapping up my hut for the winter. I’d finished putting up two of the 5 pieces that would’ve been required to cover the whole roof, when it started raining. I had no other option but to cover the rest of the roof with the tarp again…

Unfortunately, it didn’t rain much. Not even enough to completely moisten the ground. Dry lightning rumbled and crackled throughout the day, and by early afternoon, I could see smoke to the south, the south east, and on a ridge line to the north east. The smoke to the south was somewhat disturbing, because prevailing winds could push it my way. I could see firefighting planes circling the smoke low, only several miles away. Fortunately, the smoke in that area cleared fairly quickly, to be replaced by a thicker plume to the south east. On my way into town, I saw half a dozen fire engines heading in the opposite direction, and this morning, I passed a huge convoy of 30 or so assorted fire trucks heading that way, probably to mop up after yesterday.

Defending the Garden

I checked my garden first thing in the morning, as I usually do, before even pulling on my pants. To my dismay, I found that I’d lost another 10 or so corn plants, or twice as many as I lost yesterday. Clearly, what happened yesterday wasn’t an isolated incident; whatever it is that’s eating my plants knows they’re there, and likes them. I don’t blame them. I ate some corn shoots myself, and they’re actually quite tasty (slightly bitter at first, but then surprisingly sweet).

Great. My plan for the day was to lock up camp and head out to the city, and since that trip takes 6 hours, I usually try to leave as early as possible. But it was clear that if I left my garden unprotected, my entire crop could be lost before I returned. Something had to be done.

Before doing anything, I stepped off the dirt and onto the rocks to avoid further contaminating the crime scene, and carefully observed the ground for tracks. Unfortunately, I didn’t see much: a couple of prints that vaguely looked like rabbit, and some marks that might’ve been deer hoof prints. But without solid evidence, I wasn’t even sure what I’d need to protect my garden from. If I wasn’t sure whether it was rabbit or deer, I’ll have to defend against both.

I considered my options. If I were truly awesome in a McGyver-esque fashion, I might’ve concocted a chemical solution using random spices and cleaning liquids, that I could spray on the plants to discourage animals from eating them, without doing harm to the plants themselves. Or, perhaps I would’ve written an iPhone app to emit a frequency that plant eating animals don’t like. No. It should be a robotic sentry. Maybe it’ll even be armed. But know not to shoot at my neighbor when she comes to water the plants.

Rest assured, I only wasted mere seconds –okay, maybe a few minutes– on such fantasies. Obviously, I needed a fence. I surveyed my resources at hand. I had some chicken wire that I bought a while back, though the roll I had was only 2ft wide and 50ft long. Not enough, but it’ll have to do. I had plenty of two-by-fours laying around to use as fence posts, though it took me a while to decide how to erect the posts. One option was to bust out the post hole digger, but I quickly eliminated that option. The dry compacted ground is solid, and rocky. I wasn’t going to dig holes in that kind of ground in this kind of heat, while under time pressure. I eventually opted to build free-standing mobile fence post structure, consisting of two 4ft posts attached on ends of a single 8ft length of 2×4, with legs coming out for stability (and corner braces to keep the whole thing rigid). Two sets of those, and I’d have 4 corner posts. I busted out my power tools, and got to work.

The end result is what you see in the picture above. The chicken wire only goes 18 inches off the ground (6 inches spill onto the ground and are weighted down with rocks to hopefully prevent rabbits from digging underneath), and I strung up some neon pink twine with bright orange flags tied to it a foot or so above the wire, to hopefully discourage deer from stepping over the mesh.

I have to admit, it was a fun project. Since I still wanted to hit the road as soon as possible, I had to think fast and work fast. Running to the hardware store would’ve been too time consuming (at least an hour round trip), so I had to make do with what I had, and I think I did ok. I guess the real question is whether it works. We’ll see…